
效果预览
项目开源地址:https://github.com/buggzd/UnityDr.StrangePortal
一些基础约定
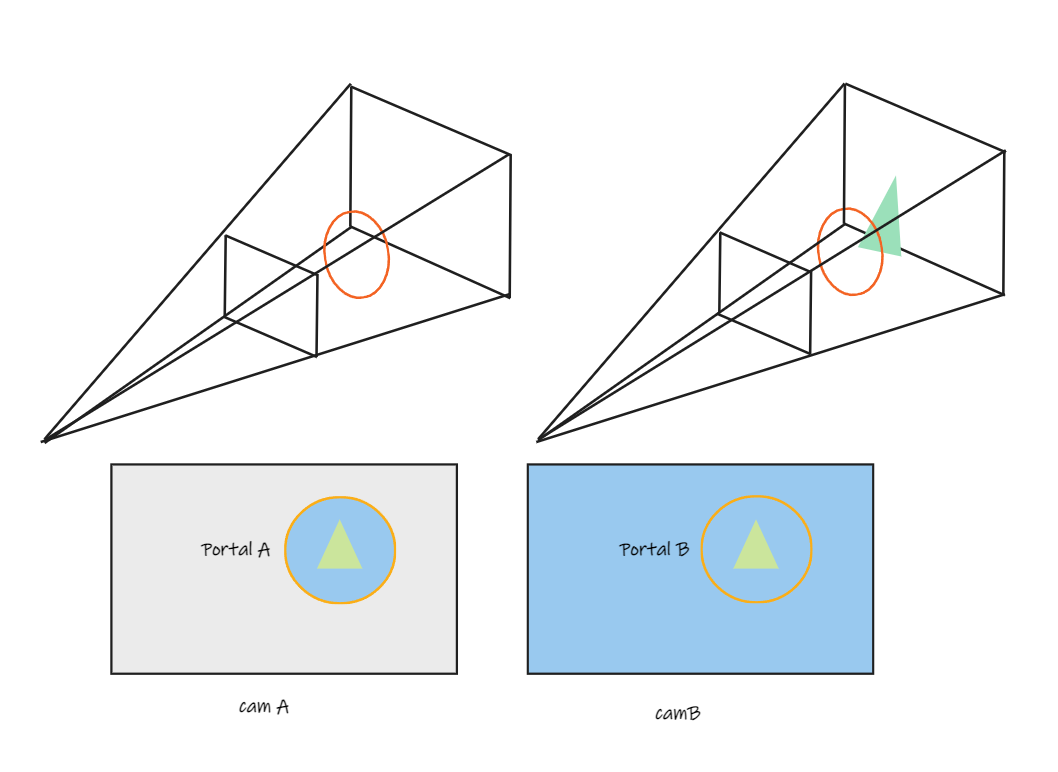
首先玩家所在的空间叫做A空间,传送门要传送去的空间叫做B空间,同时A空间下的相机(主相机)叫camA,A空间下的传送门叫portalA,B空间同理。
实现传送门内部画面
基本思路就是使用一个RT相机(该相机的所有参数应该和A相机相同),RT相机放在B空间,叫该相机camB,对于两个空间都存在一个一模一样的传送门,我们只需要让camB相对于portalB的运动和相机A相对于portalB的运动同步,那么camB得到的rendertexture上传送门的位置和A是一模一样的,我们只需要把RT图(rendertexture)上传送门内的图像贴到portalA上,就可以得到透过传送门看到传送去的场景。
1. 实现相机同步
这里是一个经典的相对运动问题,和渲染管线里的MV矩阵变化过程很类似,具体的可以去看games101。把这个脚本挂到camB上,再把camA,portalA,portalB挂上运行游戏就可以看到两个相机可以同步旋转和移动了。
using System.Collections;
using System.Collections.Generic;
using UnityEngine;

public class PortalCam : MonoBehaviour
{
    // Start is called before the first frame update
    //camA
    public Transform PlayerCamera;
    //portalA
    public Transform Portal;
    //portalB
    public Transform OtherPortal;


    // Update is called once per frame
    void Update()
    {
        //相对偏移
        Vector3 OffsetFromPortal=PlayerCamera.position - OtherPortal.position;


        //获取两个传送门之间的角度差值
        //同步转动
        float angularDifference = -Quaternion.Angle( OtherPortal.rotation, Portal.rotation);
        Quaternion portalRotationDifference = Quaternion.AngleAxis(angularDifference, Vector3.up);
        Vector3 newCamerDirection= portalRotationDifference * PlayerCamera.forward;
        transform.rotation = Quaternion.LookRotation(newCamerDirection,Vector3.up);
        //先旋转后平移
        Vector3 positionOffset = Quaternion.Euler(0f, angularDifference, 0f) * OffsetFromPortal;
        transform.position = positionOffset + Portal.position;

    }
}
2. 实现传送门贴图
这里用到的是一个很简单的屏幕空间UV采样RT贴图。开头说明了两个相机看到的画面,传送门位置相同,所以就可以直接使用camA的屏幕空间来采样camB的rendertexture。
需要注意的是如果希望做后处理,用hdr,那么camB的rendertexture需要使用支持hdr的格式,传统的3通道8位肯定是不能记录hdr信息的,可以改成16位。
传送门屏幕空间UVshader
Shader "Unlit/ScreenUv"
{
    Properties
    {
        _MainTex ("Texture", 2D) = "white" {}
    }
    SubShader
    {
        Tags { "RenderType"="Opaque" }

        Pass
        {

            CGPROGRAM
            #pragma vertex vert
            #pragma fragment frag

            #include "UnityCG.cginc"


            struct appdata
            {
                float4 vertex : POSITION;
                float2 uv : TEXCOORD0;
            };

            struct v2f
            {

                float4 screen_pos:TEXCOORD1;
                float4 vertex : SV_POSITION;

            };

            sampler2D _MainTex;
            float4 _MainTex_ST;

            v2f vert (appdata v)
            {
                v2f o;
                o.vertex = UnityObjectToClipPos(v.vertex);
                o.screen_pos=o.vertex;
                //平台兼容
                o.screen_pos.y=o.screen_pos.y*_ProjectionParams.x;
                return o;
            }

            fixed4 frag (v2f i) : SV_Target
            {
                // sample the texture
                float2 uv=i.screen_pos.xy/i.screen_pos.w;
                uv=(uv+1)*0.5;
                fixed4 col = tex2D(_MainTex, uv);

                return col;
            }
            ENDCG
        }
    }
}
使用脚本给shader赋值
这个随便写了,当然你也可以直接创建一个rt图然后拖到materia上。
using System.Collections;
using System.Collections.Generic;
using UnityEngine;

public class SetPortalTex : MonoBehaviour
{
    //camB
    public Camera cam;
    //portalA material
    public Material PortalMat;
    // Start is called before the first frame update
    void Start()
    {
        if(cam.targetTexture != null)
        {
            cam.targetTexture.Release();
        }
        //支持hdr
        cam.targetTexture = new RenderTexture(Screen.width, Screen.height,24, RenderTextureFormat.RGB111110Float);

        PortalMat.mainTexture = cam.targetTexture;
    }


}
实现传送门粒子特效
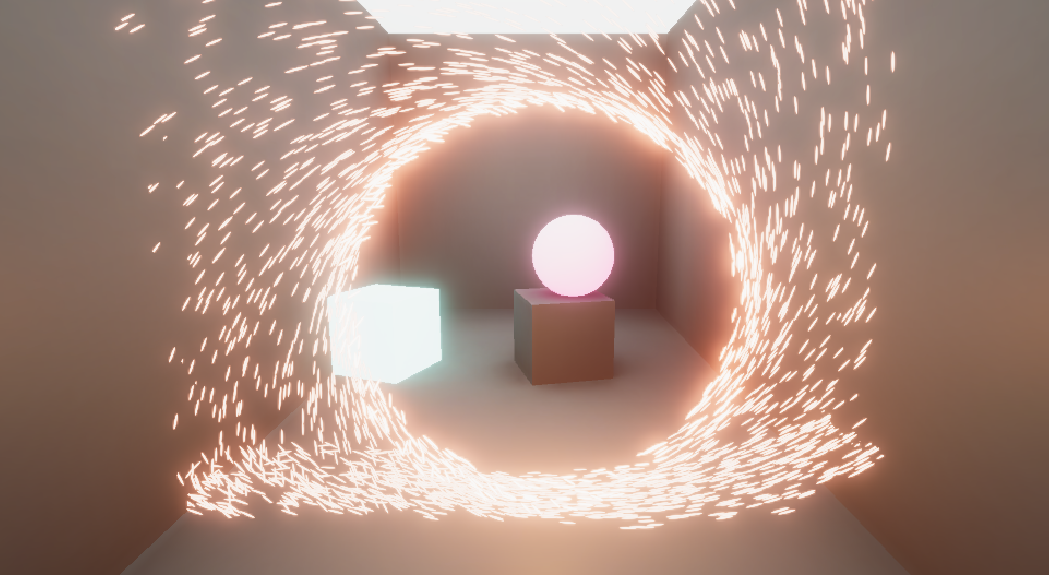
传送门的粒子特效有两种实现方式,一种是使用unity自带的粒子,另一种是使用VFX。这两种方法各有各的好处,使用自带粒子是可以做墙壁碰撞的,使用VFX则需要在VFX里设置碰撞箱。使用VFX得到的效果很不错,而且很简单易上手,但是需要用URP管线。
方法一 Unity自带粒子
这里只提供思路,具体实现细节请自行实现(因为我没用原装粒子)。这里创建多个粒子生成器,每个生成器都是向上喷发粒子,然后通过脚本动画控制每个生成器的移动,让生成器绕着传送门的圆形旋转。
方法二 VFXGraph
这个方法非常简单,大致都是根据这篇文章(https://www.bilibili.com/read/cv15931018)实现的,安装一个Unity额外的VFX扩展,和shaderGraph一样的连线调数值就可以了。
实现物体传送
基础数学知识
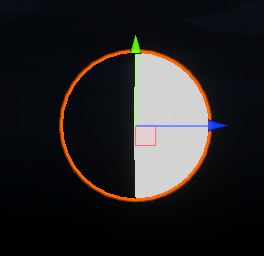
向量点积
为了实现传送门的传送判定,我们需要知道待传送物体是否在传送门正面,此时我们就需要使用向量点积来判断。通过代码控制获取传送门正向的方向向量,计算传送门到角色的向量。
向量点积的定义:
通过定义我们可以得知,当两个向量之间夹角为-90°~90°时,点积值为正。在三维中,两向量点积为正的区域正好把空间分隔为了两半,一半是点积为正的区域,一半是点积为负的区域(当然还有0)
这里我们可以测试一下,写一个简单的shader
Shader "Unlit/sphere"
{
    Properties
    {
        _MainTex ("Texture", 2D) = "white" {}
        //方向向量
        _Dir("Direction",Vector)=(1,0,0,0)
    }
    SubShader
    {
        Tags { "RenderType"="Opaque" }
        LOD 100

        Pass
        {
            CGPROGRAM
            #pragma vertex vert
            #pragma fragment frag


            #include "UnityCG.cginc"

            struct appdata
            {
                float4 vertex : POSITION;
                float2 uv : TEXCOORD0;
            };

            struct v2f
            {
                float2 uv : TEXCOORD0;
                float4 vertex : SV_POSITION;
                float3 pos_OS:TEXCOORD1;
            };

            sampler2D _MainTex;
            float4 _MainTex_ST;
            float4 _Dir;

            v2f vert (appdata v)
            {
                v2f o;
                o.vertex = UnityObjectToClipPos(v.vertex);
                o.uv = TRANSFORM_TEX(v.uv, _MainTex);
                //使用模型空间展示不同向量的点乘
                o.pos_OS=v.vertex;

                return o;
            }

            fixed4 frag (v2f i) : SV_Target
            {

                fixed4 col = tex2D(_MainTex, i.uv);
                //当点积小于0的都直接舍去
                clip(dot(i.pos_OS,_Dir));
                return col;
            }
            ENDCG
        }
    }
}
碰撞
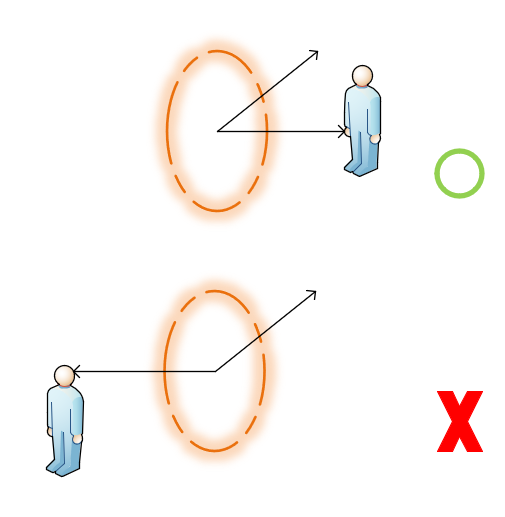
光有向量点积还不能实现传送门效果,因为只使用向量点积是否大于0来判断,会导致当带传送物体只要是在传送门后方都会被传送,就算是传送物体绕过了传送门也会被传送。这和我们期望的传送门效果不一样,这时就需要引入碰撞来解决这个问题。
具体的思路就是在传送门前加一个碰撞箱,当产生碰撞时再进行点积检测。
更改传送物体位置
在先前同步摄像机的脚本,我们解决了相对运动的问题,这里又可以再用上了,当物体确认需要传送,只需要计算好传送物体对于PortalA的偏移值,然后加在PortalB上就可以了。需要注意的是传送需要先旋转180°,需要移动到portalB的背后而不是前面。
         float rotationDiff=-Quaternion.Angle(Portal.rotation,OtherPortal.rotation);
                rotationDiff += 180;
                player.Rotate(Vector3.up,rotationDiff);
                Vector3 positionOffset = Quaternion.Euler(0f, rotationDiff, 0f) * portalToPlayer;
                player.position = OtherPortal.position + positionOffset;
完整源码
using System.Collections;
using System.Collections.Generic;
using UnityEngine;

public class PortalCollider : MonoBehaviour
{
    //PortalA
    public Transform Portal;
    //PortalB
    public Transform OtherPortal;

    public Transform player;
    private bool teleport=false;

    // Start is called before the first frame update
    void Start()
    {

    }

    // Update is called once per frame

    void LateUpdate()
    {
        if (teleport)
        {
            Vector3 portalToPlayer = player.position-Portal.position;

            //如果走到背面点积为负数
            if (Vector3.Dot(Portal.up, portalToPlayer) < 0f)
            {

                float rotationDiff=-Quaternion.Angle(Portal.rotation,OtherPortal.rotation);
                rotationDiff += 180;
                player.Rotate(Vector3.up,rotationDiff);
                Vector3 positionOffset = Quaternion.Euler(0f, rotationDiff, 0f) * portalToPlayer;
                player.position = OtherPortal.position + positionOffset;
                Debug.Log(player.position);
                teleport = false;
            }
        }
    }

    private void OnTriggerEnter(Collider other)
    {
        Debug.Log("OnTriggerEnter");
        if (other.tag == "Player") {
            teleport = true;
        }
        if (other.tag == "ball")
        {
            teleport = true;
        }
    }
    private void OnTriggerExit(Collider other)
    {
        if (other.tag == "Player")
        {
            teleport = false;
        }
        if (other.tag == "ball")
        {
            teleport = false;
        }
    }
}
